Friday 24 February 2012


Wednesday 22 February 2012
Tutorial: I'm Sexy and I Know It
Sexy on sexy: leopard print on a red hot half-moon!


 Polishes used:
Red: Sasa CBL 106
Gold: Faceshop GL111
Brown: Elianto Dark Purple


Red: Sasa CBL 106
Gold: Faceshop GL111
Brown: Elianto Dark Purple
Tutorial: Safari Manicure
In the jungle! ;)

Polishes used:
Base: Essense Cut Off The Beigh
Spots: Revlon Chocolate Truffle

Base: Essense Cut Off The Beigh
Spots: Revlon Chocolate Truffle
Sunday 19 February 2012
Inspired: Sephora by OPI
This Sephora ad caught my eye when I was flipping through a fashion magazine (Instyle magazine I think). The combination of the understated nude tone on an eye popping bright pink creates this fashion forward look. Very chic, almost reminds of a toned down Nicki Minaj kinda manicure. Instructions to a half moon manicure are available here http://polisheddiaries.blogspot.com/2012/01/tutorial-half-moon-manicure.html
Try it out! ;)


Polishes used:
Nude frankenpolish (go for a nude colour with a warm undertone)
Bright pink: Sasa CBL 102
Try it out! ;)
 |
| http://www.sephora.com/browse/brand_hierarchy.jhtml?brandId=5907 |


Polishes used:
Nude frankenpolish (go for a nude colour with a warm undertone)
Bright pink: Sasa CBL 102
Monday 13 February 2012
Valentine's Day: Glitter Tie Dye
Tomorrow
:) If you're out celebrating, congrats! If you're not, it just means
that your love story is still in the process of being written. Single,
attached, etc; I sincerely wish everyone out there a Happy Valentine's
Day! For those waiting for your fairytale, I hope Prince Charming comes
to sweep you of your feet ;)


Revlon Teak Rose
Sasa White in CBL 104
Sasa Heart Glitter CTW 503
Saturday 11 February 2012
Tell me about: Prolonging your nail polish's life
How annoyed do you get when your favorite nail polish becomes clumpy and uneven?
I know how frustrating it is to have clumpy polish that doesn't paint nicely. IT.DRIVES.ME.NUTS. Old nail polish tends to become clumpy because the polish inside dries up. Although there will come a time for every bottle to "age", there are ways to extend its "lifespan".
#1: Instead of shaking the bottle, roll it in between your palms before using.
Shaking introduces air bubbles in the bottle, which causes the polish to dry up.
#2: Clean the mouth/cap of the bottle if it has dried polish stucked onto it.
Many of us ignore this but dried up polish on the threaded parts of the cap and mouth of bottles are really silent killers. It leaves gaps for air to come in, so the polish dries faster.
#3: Don't leave the bottle open for long.
Exposure to air causes nail polish to become clumpy and dry faster. To maintain the consistency of your polish, avoid being lazy by leaving the bottle open in between waiting for fingers to dry. Close the cap properly immediately after you're done with it.
#4: Paint your nails in an area with little ventilation (i.e. off the fan/aircond).
Again, air flow encourages the polish to dry out. Sounds extreme? But it sure works. You don't have to do this every time you paint your nails, maybe just with your favourite colours.
#5: Buy brands of reputable quality.
I'm not saying you have to buy expensive, branded nail polish but there's no harm investing in brands which have good reviews. Can you believe after 30 years, my mum's Revlon Ice and Fire (red polish) still worked? At first, that polish looked more like a suspension; but after evenly mixing, the consistency was perfect. From experience, the cheaper "no name" brands tend to dry and clump up faster.
#6: Keep your polish in a cool place like the refrigerator. (That's what they do in some nail salons)
I guess keeping it cool slows down the process of drying/evaporation.
#7: Store your bottles in an upright position.
This prevents the pigments and solvents from separating.
#8. Add small stainless steel balls in your polish.
Adding a few of these balls help to evenly mix your polish as you roll it, leaving a more even consistency. It can also smoothen up clumps.
So, 8 do-able tips to prolong your nail polish's life ;) All these tips are from my personal experience. If all else fails, you can add thinner/nail polish remover to dissolve the clumps to restore the polish's smooth consistency. Hope it helps!
P.S. : Do subscribe/comment, I'm feeling a little unappreciated :(
Thursday 9 February 2012
Valentine's Day: Ladybird Manicure
You see, most Valentine manicures would include the usual hearts and glitter; so this year why not try something new? I know ladybirds are not the first that comes to mind when it comes to romance, but these creatures have meaning behind their adorable appearance. Red and black are both sexy and mysterious colours for your nails too! ;)
Some belief that if caught and then released, a ladybird would fly to your true love and whisper your name in his/her ear. Upon that, your true love would come searching for you. Also, ladybirds are a love symbol in which the number of spots indicate the number of months to pass before love comes.
Sorry about the picture quality, camera phone boooo. Nevertheless, that shouldn't stop you from creating your ladybird nails!


Steps:
1. Paint your whole nail a solid red. (I opted for a tangerine red)
2. Paint the tip of each nail a solid black.
3. Using a doting tool/nail brush, paint a black line on the middle of each nail.
4. With a doting tool, dot the red parts of the nail to create the ladybird's signature spots. About 5-7 dots per nail depending on the size of your nails. Refer to a picture of a real ladybird to guide you.
5. Seal it all in with a top coat! To prevent smudges, wait for the polish to complete dry before applying the topcoat. Also, apply top coat in swift motions and avoid painting over the same spot repeatedly.
Polishes used:
Sera Red
Sasa Black CBL 105
 |
| http://mm-aboutanything.blogspot.com/2011/07/ladybugs.html |
Sorry about the picture quality, camera phone boooo. Nevertheless, that shouldn't stop you from creating your ladybird nails!


1. Paint your whole nail a solid red. (I opted for a tangerine red)
2. Paint the tip of each nail a solid black.
3. Using a doting tool/nail brush, paint a black line on the middle of each nail.
4. With a doting tool, dot the red parts of the nail to create the ladybird's signature spots. About 5-7 dots per nail depending on the size of your nails. Refer to a picture of a real ladybird to guide you.
5. Seal it all in with a top coat! To prevent smudges, wait for the polish to complete dry before applying the topcoat. Also, apply top coat in swift motions and avoid painting over the same spot repeatedly.
Polishes used:
Sera Red
Sasa Black CBL 105
Friday 3 February 2012
Valentine's Day: Polka Dot Manicure
Polka dots are back, beautiful people! This simplistic pattern gives a girly touch to your nails, perfectly suited for Valentine's Day. Mmm hmm, the day that many of us girls rush to get ready to look the best we can for a fun day out with friends or significant others. Polka dots nails are flirty and feminine, and it shows that you put a little extra effort to dress up ;) And, it's one of the easiest nail art to do!
Tip: Start with dotting the middle dot. That will provide bearing so your dots won't look lopsided.
Alternative colour combinations:
Pink with gold dots; black with white dots; red with black dots; blue with gold dots; dusty rose with white dots; turquoise with white dots and a list of endless possibilities ;) it's all up to your creativity! Mix around with matte and glossy finishes, dark and light colours, metallic and solid colours.
Go with more romantic or feminine colours like pinks, golds, white, beigh, nudes, creams, or reds if it's for Valentine's Day <3
My dotting tool was the rounded end of a sewing pin. You can use a toothpick, a pen which has ran out of ink, rounded end of a bobby pin or any object with a small rounded tip.


Polishes used:
Background: Essense Cut Off The Beigh
Dots: Revlon Vixen
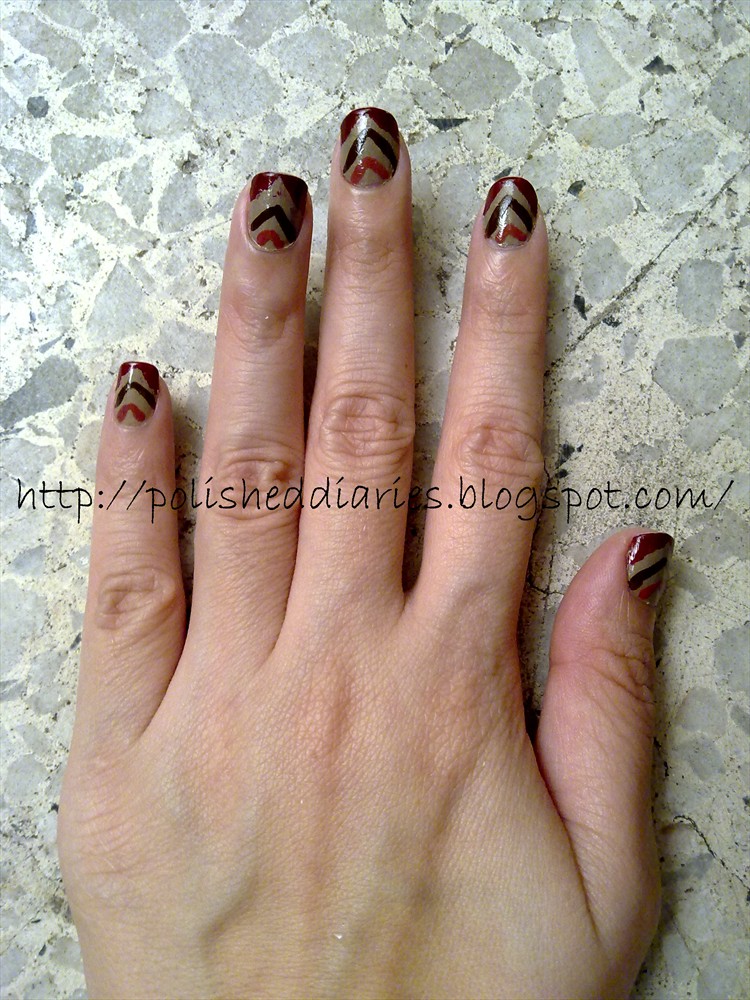
NOTD: Chevron Manicure
A chevron (also spelled cheveron) is an inverted V-shaped pattern. So, a chevron manicure is like a french manicure but with inverted v-shaped tips.


I used cellophane tape to guide me while painting the deep red tips. The chevron lines were hand drawn on. Might take a little practice but it is definitely worth the effort ;)
Polishes used:
Base: Essence Cut Off the Beigh
Chevrons (from tip to base): Revlon Valentine, Daiso brown nail art polish, Revlon Teak Rose
Wednesday 1 February 2012
Tell me about: Crackle/Shatter Nail Polish
Crackle/shatter nail polish is one of the most popular trend of late. From shades of black to white and brands from OPI to Sasa, crackle nail polish has certainly made its way into the world of manicures. Not only is it easy to apply, crackle nail polish gives a fun edge to solid manicures.

How does the crackle polish function?
First of all, one must apply a base color in which this color will show through the cracks. Upon drying the base color, paint on the crackle polish. The trick is to paint a good amount of crackle polish with swift brushing motions.
Using too little polish will create scratches, not cracks; painting too much will result in a muddy mess. Be as quick as possible so the polish to dries as whole to create nice and obvious cracks. You do not have to be neat while painting this coat, because when the crackle polish dries it will form a broken, cracked like pattern on the base color.
As the coat of crackle polish dries, it will automatically crack to form the desired pattern. Don't worry if it doesn't look significantly cracked at first because the polish cracks as it dries. The secret ingredient of the crackle formula is ethanol which allows the polish to dry so rapidly it produces an appearance of a shattered surface. It is also formulated so the polish dries unevenly to produce the cracked effect.
This youtube video provides a clear demonstration of the use of the shatter polish http://www.youtube.com/watch?v=TcyDVIRrZqw
What color should I buy for my crackle polish?
It depends. What color makes up the majority of your nail polish collection? If you own mostly light colors, go with a darker crackle polish like black and vice versa. The key here is to create contrast when compared to your base color.
How do I match the base color with the crackle polish?
This is by no means the way you should do your crackle manicure but I recommend pairing a light base with a dark crackle and vice versa. Matching metallic base with a solid crackle and vice versa works well too. It looks good when both colors get to stand out together without one overshadowing the other.
Hm I personally love turquoise and gold; deep red and gold; black and yellow, red and black; silver and black. Oooh looks like black is the most versatile color for a crackle polish!
Polishes used:
Base coat: Faceshop
Top coat: Sasa
Shatter polish: OPI Black (credits my cousin <3)
Base colors: self-made gray frankenpolish with a layer of duo-chromatic glitter on top
Enjoy! ;)

 |
| OPI Shatter in Black |
First of all, one must apply a base color in which this color will show through the cracks. Upon drying the base color, paint on the crackle polish. The trick is to paint a good amount of crackle polish with swift brushing motions.
Using too little polish will create scratches, not cracks; painting too much will result in a muddy mess. Be as quick as possible so the polish to dries as whole to create nice and obvious cracks. You do not have to be neat while painting this coat, because when the crackle polish dries it will form a broken, cracked like pattern on the base color.
As the coat of crackle polish dries, it will automatically crack to form the desired pattern. Don't worry if it doesn't look significantly cracked at first because the polish cracks as it dries. The secret ingredient of the crackle formula is ethanol which allows the polish to dry so rapidly it produces an appearance of a shattered surface. It is also formulated so the polish dries unevenly to produce the cracked effect.
This youtube video provides a clear demonstration of the use of the shatter polish http://www.youtube.com/watch?v=TcyDVIRrZqw
What color should I buy for my crackle polish?
It depends. What color makes up the majority of your nail polish collection? If you own mostly light colors, go with a darker crackle polish like black and vice versa. The key here is to create contrast when compared to your base color.
How do I match the base color with the crackle polish?
This is by no means the way you should do your crackle manicure but I recommend pairing a light base with a dark crackle and vice versa. Matching metallic base with a solid crackle and vice versa works well too. It looks good when both colors get to stand out together without one overshadowing the other.
Hm I personally love turquoise and gold; deep red and gold; black and yellow, red and black; silver and black. Oooh looks like black is the most versatile color for a crackle polish!
Polishes used:
Base coat: Faceshop
Top coat: Sasa
Shatter polish: OPI Black (credits my cousin <3)
Base colors: self-made gray frankenpolish with a layer of duo-chromatic glitter on top
Enjoy! ;)
Subscribe to:
Posts (Atom)